 📷 题解插图
Windows下Libvirt Java API使用教程(三)- TLS认证访问和动态连接文件依赖
突兀的出来一个libvirt的教程三,您可能会觉得奇怪,其实这是OneCoder以前写的一个小系列教程,原来发在51cto的博客上,前两篇已经发了过来,考虑到完整性,就把第三篇也发过来。前两篇地址:
之前已经介绍过了libvirt api的上手使用方式,这里再补充一些细节问题。
TLS安全认证访问:
之前我们给出的例子都是直接用tcp访问的,这就需要被访问的服务器开放tcp访问的端口,也就是说,任何机器只要知道了服务器的ip,都是可以访问上面的libvirt接口的。这是十分危险的,在生产环境中是不可取的。
所以,libvirt支持基于tls认证的安全访问协议。连接格式如下:
qemu+tls://10.4.54.10
或者
qemu://10.4.54.10(因为默认就是走tls的)
要想正常访问,必须在客户端和服务端配置证书,下面就介绍一个这个配置过程。
- 首先自然是证书生成工具的安装。libvirt官方推荐的工具是:GnuTLS。不过可惜,官网给出的地然居然不正确。GnuTLS项目,官网地址如下:
下载页面为:
这里介绍的windows环境下配置,所以进入页面:
下载即可。
- 解压下载的工具。通过命令行进入**\bin目录(或者将该bin目录配置到环境变量的path**即可在任意路径访问):
- 首先为你的证书生成私钥:
Create a private key for your CA:
certtool --generate-privkey > cakey.pem
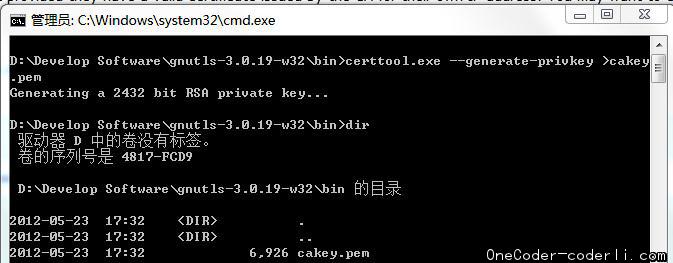
然后,为你证书进行自签名。
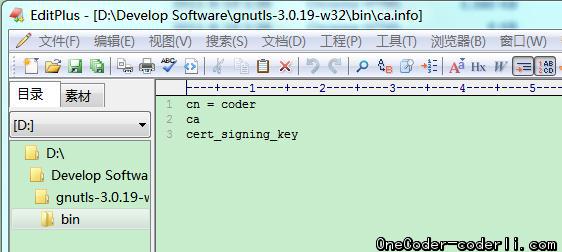
and self-sign it by creating a file with the signature details called ca.info containing:
cn = Name of your organization
ca
certsigningkey

certtool --generate-self-signed --load-privkey cakey.pem   --template ca.info --outfile cacert.pem (Y)
先在当前路径下创建一个叫ca.info的文件,里面写上如上第一段内容,
然后执行第二段引用所示命令:
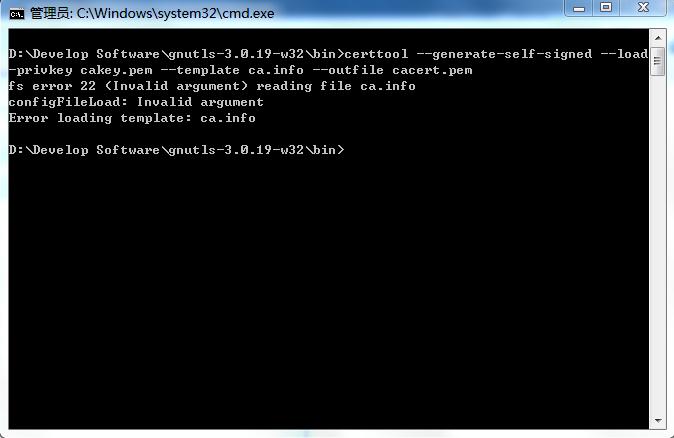 报错。这下头疼了。。笔者翻箱倒柜,翻江倒海找了一通。。实在没有找到答案。。。考虑到证书的制作过程中没有与机器相关的信息,所以,决定求助笔者非常不熟悉的linux。掏出putty,登录,重新执行上面第一个命令。生成私钥:
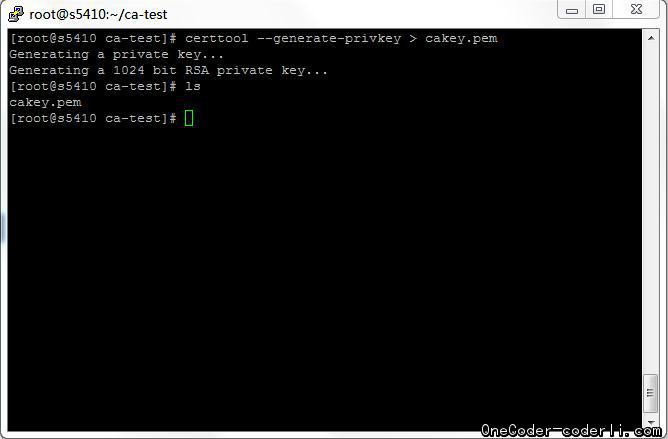
然后同样按照上面的方式进行签名,果然轻松成功!
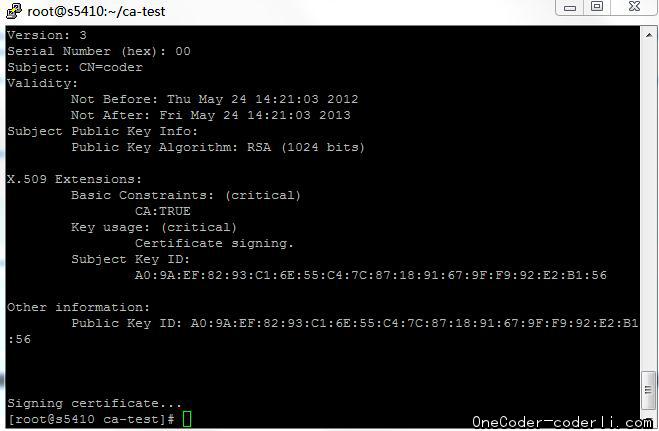
此时已经可以删除ca.info文件了。继续生成证书,接下来开始生成服务端私钥:
certtool --generate-privkey > serverkey.pem
然后签名:
certtool --generate-certificate --load-privkey serverkey.pem --load-ca-certificate cacert.pem --load-ca-privkey cakey.pem --template server.info --outfile servercert.pem
同样是依靠一个叫做server.info的文件。先创建改文件,写入如下格式内容:
organization = Name of your organization
cn = oirase
tlswwwserver
encryptionkey
signingkey
这里只有cn这个属性需要注意,他应该是当前主机的主机名:(
only the CN field matters, which as explained above must be the server's hostname)- (The CN must match the hostname which clients will be using to connect to the server. In the example below, clients will be connecting to the server using a URI of xen://oirase/, so the CN must be "oirase".)
如果不知道主机名,用ip当然也是可以的。那么你的访问就是通过IP访问了。:)
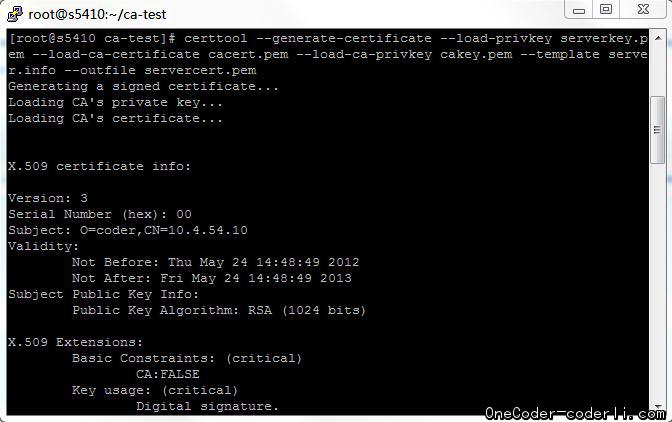
成功。
将服务端证书拷贝服务器的相应位置:
Finally we have two files to install:
serverkey.pem is the server's private key which should be copied to the server only as /etc/pki/libvirt/private/serverkey.pem.
servercert.pem is the server's certificate which can be installed on the server as /etc/pki/libvirt/servercert.pem.
最后是客户端的证书,过程类似,这里只列出主要过程和命令:
1、创建私钥:
certtool --generate-privkey > clientkey.pem
2、创建client.info模版文件:
country = GB
state = London
locality = London
organization = Red Hat
cn = client1
tlswwwclient
encryptionkey
signingkey
然后签名:
certtool --generate-certificate --load-privkey clientkey.pem \
  --load-ca-certificate cacert.pem --load-ca-privkey cakey.pem \
  --template client.info --outfile clientcert.pem
3、拷贝证书到客户端的指定位置(linux):
cp clientkey.pem /etc/pki/libvirt/private/clientkey.pem
cp clientcert.pem /etc/pki/libvirt/clientcert.pem
其中client.info中国家等信息可根据你的情况指定。
至此,需要的证书已经都准备好了。证书有了,服务端也部署了。但是windows的客户端不知道该部署到什么地方?因为网上的说明给出的都是linux文件路径,没说windows下的情况。不过笔者相信libvirt的错误日志:)于是:
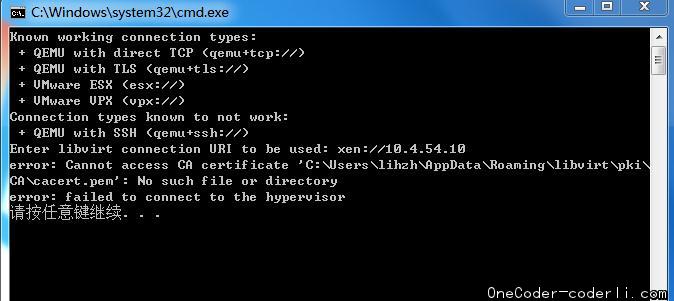
怎么样,位置有了吧。赶紧拷贝过去试试。
有的同学可能发现,这里只给出了一个位置,我们有三个证书呢。别急,你看这个路径,比照网上给出的linux的路径格式:
| Location | Machine | Description | Required fields |
|---|---|---|---|
| /etc/pki/CA/cacert.pem | Installed on all clients and servers | CA's certificate (more info) | n/a |
| /etc/pki/libvirt/ private/serverkey.pem | Installed on the server | Server's private key (more info) | n/a |
| /etc/pki/libvirt/ servercert.pem | Installed on the server | Server's certificate signed by the CA. (more info) | CommonName (CN) must be the hostname of the server as it is seen by clients. |
| /etc/pki/libvirt/ private/clientkey.pem | Installed on the client | Client's private key. (more info) | n/a |
| /etc/pki/libvirt/ clientcert.pem | Installed on the client | Client's certificate signed by the CA (more info) | Distinguished Name (DN) can be checked against an access control list (tls_allowed_dn_list). |
其实基本已经可以猜出windows下的目录组织了。linux在的**/etc目录,就想当于我们这里的..\libvirt**目录,子目录的组织相同即可。
没猜出来也不用担心,最多我们复制一个证书尝试一次,错误信息会依次告诉你所有的路径的:)
再访问一下,成功~
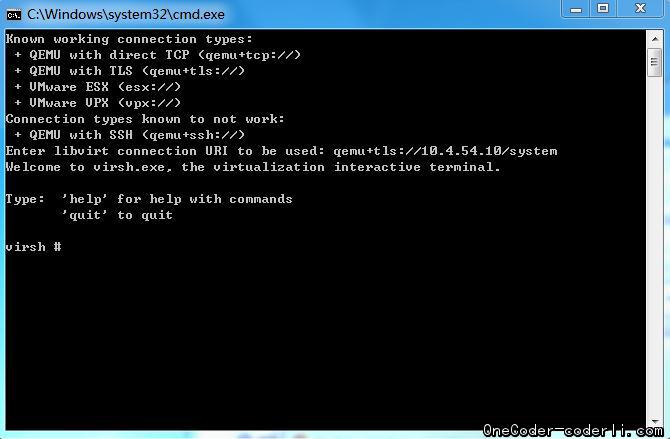
补充说明一下关于动态链接文件的问题:
之前介绍的时候,笔者只提到说调用libvirt Java api需要一个virt.dll文件,这个文件笔者是拷贝的libvirt-0.dll文件改名而来,然后访问成功。
笔者后来发现,原来libvirt 安装目录的bin文件夹下的所有文件,其实都是该dll文件的依赖文件,当笔者将其他文件删除或转义的时候,依然会报找不到virt.dll文件的错误。所以,如果调用libvirt Java API开发,可以将所有的dll拷贝到一个指定位置,然后指定jna.library.path到该位置即可。
所有代码开源上传至 GitHub:yummy-code 仓库 · GESP 专题站:GESP WIKI
欢迎加入:C++ GESP/CSP 考级答疑群(688906745) 与 Java/Python交流群(982860385),点击可直接加群。
猜你想读 · 相关文章推荐
Windows下Libvirt Java API使用教程 - 开发环境部署
<a href="http://libvirt.org/" target="\blank"Libvirt</a是一个优秀的虚拟化环境管理的工具包。核心用c实现,不过提供了不同语言的调用API。官网的简介如下: libvirt is: - A toolkit to interact with the virtualiza...
Windows下Libvirt Java API使用教程(二)- 接口使用说明
介绍完<a href="http://www.coderli.com/windows-libvirt-one" target="/blank"libvirt Java API的部署工作</a,接下来我们就介绍一下接口的使用和代码样例。 libvirt的管理单位是单个主机,所以探测和监控接口所能获取的信息的最大范围也是主...
Java 利用ASM读取变量值(Field value)问题研究
最近在学习Spring源码的过程中,遇到了spring-asm工程的重新打包的问题,于是突然就想研究一下asm这个开源字节码操作工具。秉承我的一贯风格,想到啥就立马学啥。 对于开源产品,我的一贯风格就是通过其官方提供的源码版本管理地址(svn/git等),直接下载最新代码,构建Java工程,直接通过工程依赖的方式研究学...

OneCoder (lihongzheshuai)
一个中年人的自留地,记录学习 C++、GESP/NOI、Java、Python 与算法架构的心得体会。本站唯一网址:coderli.com